Pages

Saturday, January 30, 2016

Tying an SF Fiber Baitfish Fly


Tying an SF Fiber Baitfish Fly


(In 2015 Grant tied a large batch of SF Baitfish flies for friend/guide/BPS Pro Staffer Harry Robertson to take to the Amazon. Those flies helped Harry's clients land many gorgeous Peacock Bass like the beauty pictured above!)


Materials:

Hook: Owner SSW 1/0-5/0

Thread(s):  Monofilament tying thread for the body, 70 or 140 denier thread to match the top color of the fly
Body: SF Fibers in desired colors
Flash: Flashabou to match SF Fibers
Lateral Line: Holographic Flashabou or Lateral Scale
Eyes: Large 3D molded eyes
Glues: Sally Hansen Hard as Nails or equivalent head cement, Loctite GEL
Helpful tools: A rotary vise makes this fly much easier

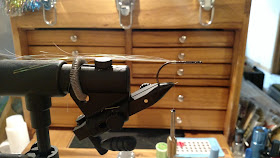
Step 1:  Start your monofilament thread on the hook and run it to the back. Monofilament thread is the best option for this fly because it lets the colors of the SF fiber show through.

Step 2: Tie in 2-3 strands of flashabou in your desired colors in the midpoint of the material, then fold it back and wrap over it. This helps make sure the material doesn’t slip.

Step 3: Take a thin clump of SF fiber in your desired color. Don’t use any more than what is pictured here. If you use much more than this, the fly will be very thick when finished and won’t fish correctly.  

Step 4: Tie in the clump of fiber in the midpoint like we did with the flashabou and fold it back just the same. It should look similar to what is pictured here.
 

Step 5: It helps to have a rotary vise for this fly because you will have to flip the fly over after every step. Invert the fly and repeat step 4 and work the material around the hook.  

Step 6: Repeat steps 4 and 5 until you reach just behind the eye of the hook.  If you are planning on making a white bellied baitfish fly. I like to do all white material on the bottom and the first two ties of material on top. After the first two on top I begin tying in the color (in this case chartreuse.  This helps make the fly appear more natural with just the right amount of color on top.  Stop your materials about an eye width back from the hook eye.  


Step 7: Whip finish off your mono thread.  It helps to double whip finish this stuff because sometimes it likes to unravel. Add a dab of Sally Hansen and then start your colored thread right on top of the mono.  I like to use the thin thread here because it prevents a large build up.

Step 8: Take about 4 strands of the holographic flashabou and tie them in in the center of the material on the near side of the fly right down the center.  Then fold the material around the eye and run it down the center of the opposite side of the fly as well.  This flash line serves as the lateral line for the fly.

Step 9: After tying in the flash down the sides, use your colored thread to cover up the mono thread entirely, as well as the tie in point for the flash.  This builds a nice head that matches the top of the fly.  Whip finish off and coat in Sally Hansen.

Step 10:  I find it’s easiest to turn the fly on its side for this step.  Use a drop of Loctite Gel right behind the thread head, on top of the flash we just tied in. Then push your large 3D molded eye onto the drop.  The gel Loctite works best because it doesn’t run while you are getting the eye into position. Repeat on the opposite side of the fly. I like to coat the thread head again with Sally Hansen and to make sure to get a little bit back onto the eyes.  This helps the durability of the fly.  

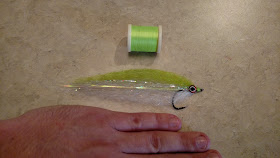
Step 11: Trim the fly to your desired shape.  I like to round the top and bottom of the fly symmetrically while letting it taper off.  This is the typical size I tie these flies in.  

And that’s it! These flies can be tied pretty quickly after a little practice.  They are very durable and have been responsible for bringing many species of fish to my hands!  There are endless color combinations that you could tie these flies in to match just about any baitfish in any environment. You can trim the material to any shape you desire as well.  The SF fiber also accepts permanent marker very well and I like to add barring and dots to a lot of my flies.  I have used this simple pattern to catch everything from Largemouth to Stripers and Redfish to even a few catfish. The material is long enough to where you could tie it in without folding to make flies large enough to target musky as well. Just about any predator species will happily demolish one of these that’s cast into its home waters.  I hope this post will help you get creative with this easy to use material and create some really cool flies!
Tight Lines,
Grant Alvis


Tying a Hybrid Carp Worm Fly

Tying a Hybrid Carp Worm Fly


Materials:

Hook: Octopus Straight Eye size 1
Thread: Brown 70 Denier
Eyes: Mico Lead Eyes (can also use black nickel eyes)
Tail: Red or Natural Colored Ultra Chenille (San Juan Chenille)
Body: Peacock Herl
Collar: Indian Hen Soft Hackle
Other: A Lighter can be used to taper off the tail of the fly


Step 1: Start the thread and attach the lead eyes directly behind the eye of the hook.  This will help the fly stand up higher in the water.


Step 2: Attach the chenille as shown. I like to tie it in right behind the eyes to help bulk up the body later.  Allow roughly an inch to hang off the back of the hook to act as the worm tail.


Step 3:  Take 3 or 4 strands of peacock herl and attach them to the hook right where the last thread wraps are holding the worm chenille.


Step 4: Wrap the pieces of peacock herl up the shank of the hook tightly one right after another. Tie them off and snip them right behind the lead eyes.


Step 5: Pull a feather from the Indian hen cape. I like to prepare the feather as shown to help me tie it in more cleanly. This type of tie in is often referred to as tying in the feather “soft hackle style”.  


Step 6: Tie in the feather directly behind the eyes as shown. You are basically tying it in right on top of where you clipped the peacock herl.


Step 7: Palmer the feather around the hook shank behind the eyes 3 or 4 times. Tie it off behind the eyes and stroke the fibers back and wrap in front of them several times. This will help them lay back against the fly.


Step 8: Jump your thread in front of the eyes and whip finish and snip off the thread.


Step 9: This is an optional step but I think it makes the fly look better.  Take a lighter and quickly poke the worm tail into the flame and remove it from the flame.  This will taper the tail down smoothly.  MAKE SURE TO DO THIS QUICKLY, that way you don’t mess up and catch the chenille on fire.


That’s the finished fly! The original pattern was designed by John Montana and he designed it solely for the purpose of fooling big carp. I mainly use this fly for what it was intended and due to its size, even the spookiest of carp can usually be coaxed into sipping this pattern in. You can tie this fly thin without too many hackle wraps like the one on the left or you can add a few more hackle wraps to really bulk up the body like the one on the right. I tie it in a few colors but my most successful have been red and a natural tan. This fly has been responsible for landing smallmouth, largemouth and sunfish species for me as well.  
Tight Lines,
Grant Alvis

Thursday, January 28, 2016

No Rest for the Wicked

Check out our latest video!  A compilation of all of the great fish we caught on film in 2015. It was an amazing year, here's to an even better 2016!
-Josh D.

Sunday, January 3, 2016

New Trophy for New Years: The Brook Trout

New Trophy for New Years: The Brook Trout


“You’re insane”- That was the common phrase coming from my friends at the New Year's Eve party I was at. I explained to everyone that I would be heading to the mountains once the party was over, no sleep for me in the forecast. 2016 would start the same way as many of the great trips of 2015 had went, with an all-nighter “suicide run” to hunt down one of the targets on my angling hit list. We all said our cheers as the clock struck midnight, but for me the hourglass had now been flipped; it was a race against the sun.


I loaded up the gear and hit the road, burning down I-64 West to the mountains, windows down and fueled by 5 Hour energy. I arrived on the banks of a stream notorious for being the home of some monstrous Trout. Just as the sun peaked over the mountains I made the first of a few hundred casts that day.

It wasn’t long before I felt a slight tug on my line, almost as if I had picked up some grass. My spinnerbait snagged what looked like a leaf, it turned out to be one of the coolest unexpected catches of my life, a small stone colored Sculpin. Sculpins live among the rocks in the swift streams of the Blue Ridge Mountains and are a favorite snack of big Trout everywhere.


After taking a mid-day break I caught a second wind and powered through the rest of the day, picking off trout here and there. All average size fish with no giants up until that point. On what seemed like my thousandth cast of the perilously windy day the bruiser I came for showed up to the party. As I was about to pull my Joe Fly out of the water I got hammered, no more than a foot from the bank. The beast head shook back and forth, not wanting to give an inch. She finally got turned away from me and managed to make a few strong runs before I scooped her up into the net.


January 1st, 2016 was a success. 36 hours straight without sleeping, a 4 hour ride into the mountains under the cover of darkness, 28 degrees, 15 mph winds, and a few hundred casts later I had captured what I had come for, a 17.50 inch Virginia trophy Brook Trout. I couldn’t have asked for a better start to the year, my 14th trophy species and my first trophy of 2016! Hopefully a good omen for what’s to come!

Fish Hard or Stay Home,

Josh D.